Amazon EKS is a managed service that makes it easy for you to run
Kubernetes on AWS. The first thing you need to do is to dockerize your project.
Here is the Dockerfile and it is using multi-stage builds to reduce the
image size and surface attacks.
|
FROM node:10 AS ui-build |
|
|
WORKDIR /usr/src/app |
|
|
COPY my-app/ ./my-app/ |
|
|
RUN cd my-app &&
npm install && npm run build |
|
|
|
|
|
FROM node:10 AS
server-build |
|
|
WORKDIR /root/ |
|
|
COPY --from=ui-build
/usr/src/app/my-app/build ./my-app/build |
|
|
COPY api/package*.json
./api/ |
|
|
RUN cd api && npm
install |
|
|
COPY api/server.js ./api/ |
|
|
|
|
|
EXPOSE 3080 |
|
|
|
|
|
CMD ["node", "./api/server.js"] |
Dockerizing React App With NodeJS
Backend
//
build the image
docker build -t react-node-image .// running on Image
docker run -it -p 3080:3080 --name
react-node-ui react-node-image// list the image you just built
docker images// list the container
docker ps
Pushing Docker Image To ECR
Amazon Elastic Container Registry (ECR) is a
fully-managed Docker container registry that makes it easy for
developers to store, manage, and deploy Docker container images. Amazon ECR is
integrated with Amazon Elastic
Container Service (ECS), simplifying
your development to production workflow.
Amazon ECS works with any Docker registry such as Docker
Hub, etc. But, in this post, we see how we can use Amazon ECR to store our
Docker images. Once you set up the Amazon account and create an IAM user with
Administrator access the first thing you need to create a Docker repository.
You can create your first repository either by AWS
console or AWS CLI
AWS console
Creating a repository with an AWS console is
straightforward and all you need to give a name.

creating repository

AWS CLI
The first thing you need to do is
authenticate to your default registry. Here is the command to authenticate to
your default registry. You need to make sure you are putting the correct
regions and account id in the command.
aws ecr get-login-password --region us-east-1 | docker login --username AWS --password-stdin aws_account_id.dkr.ecr.us-east-1.amazonaws.com

Authenticating to ECR
It’s time to create a repository with the
following command
aws ecr create-repository \

     --repository-name frontend/react-node\

     --image-scanning-configuration scanOnPush=true \

     --image-tag-mutability IMMUTABLE

     --region us-east-2

Creating repository
You will have the same result as this as
well.

Repository
Tagging your local Docker image and Pushing
You created a Docker image on your
local machine earlier. It’s time to tag that image with this repository URI in
the above image.
docker tag react-node-image:latest 032840272187.dkr.ecr.us-east-2.amazonaws.com/frontend/react-node:v1
Once you tag the image and it’s time to
push the Docker image into your repository.

pushing Docker image

Docker image with tag v1
Create
a Cluster and Worker Nodes
Getting started with AWS EKS is easy all
you need to do this e following steps
·
We need to
create an AWS EKS cluster with AWS console, SDK, or AWS CLI.
·
Create a
worker node group that registers with EKS Cluster
·
When your
cluster is ready, you can configure kubectl to communicate
with your cluster.
·
Deploy and
manage your applications on the cluster
Cluster
Creation
Let’s create a cluster by following this guide
here. Make
sure you created a role for the EKS to allow Amazon EKS and the Kubernetes
control plane to manage AWS resources on your behalf. I created a role
called eks_role

eks role
Go to the EKS console and configure the
cluster as below. I used the Kubernetesnode groupam version 1.17 and you can check the
Cluster service role.
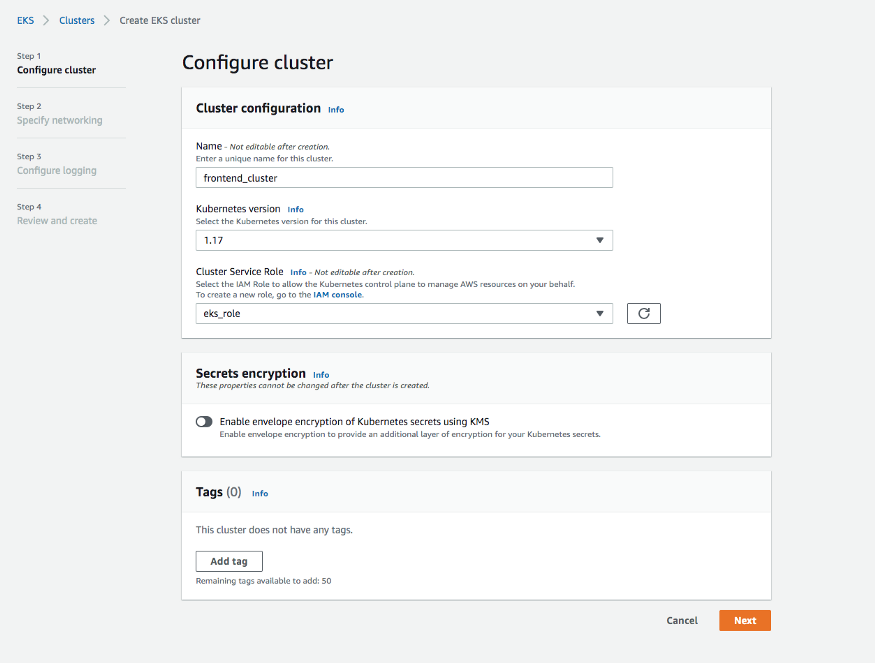
Configure Cluster
It takes some time for the cluster to get
created and it should be in the active state once it is created.

Cluster Creating

Cluster is Active
Create Worker Nodes
It’s time to create nodes and before you
do that we have to create this role called NodeInstanceRole. Follow this guide to
create one.

NodeInstanceRole
Follow this guide to
create a node group after the role is created. It takes some time for the nodegroup
to get created. You will see the static as Active once done.

Node Group is active
Configure
kubectl to use Cluster
·
We need to
install kubectl on our machine, follow this guide to install depending on your OS.
·
The next
thing we need to do is to install an aws-iam-authenticator. Follow this guide. We need this to authenticate the
cluster and it uses the same user as AWS CLI is authenticated with.
·
Use the
AWS CLI update-kubeconfig command to create or update
your kubeconfig for your cluster. Here region-code is us-east-2 and
cluster_name is frontend_clutser
aws eks --region region-code update-kubeconfig --name cluster_name
connected to cluster
You can check with these commands.
// get the service

kubectl get svc// get the current context

kubectl config current-context

Connected to AWS EKS
Deploy
Kubernetes Objects On AWS EKS Cluster
Now we have configured kubectl to use AWS
EKS from our own machine. Let’s create deployment and service objects and use
the image from the AWS ECR. Here is the manifest file which contains these
objects.
manifest. YAML
If you cloned the above example project
and you are at the root folder just use this command to create objects kubectl
create -f manifest.yml

kubectl
create -f manifest.yml
You can use the following commands to
verify all the objects are in the desired state.
// list the deployment

kubectl get deploy// list the pods

kubectl get po// list the service

kubectl get svc

all objects are deployed
Summary
·
Amazon
Elastic Kubernetes Service (Amazon EKS) is a managed service that makes it easy
for you to run Kubernetes on AWS without needing to stand up or maintain your
own Kubernetes control plane.
·
You need
to create an AWS Account as a prerequisite.
·
It’s not a
best practice to use your root account to do any tasks instead you should
create an IAM group that has permissions for administrator access and add a
user to it and log in with that user.
·
You should
use this command aws configure with access key and secret key.
·
Amazon EKS
is a managed service that makes it easy for you to run Kubernetes on AWS.
·
Amazon
Elastic Container Registry (ECR) is a fully-managed Docker container
registry that makes it easy for developers to store, manage, and deploy Docker
container images.
·
Amazon ECR
is integrated with Amazon Elastic Container Service (ECS), simplifying your development to
production workflow.
·
Amazon ECS
works with any Docker registry such as Docker Hub, etc.
·
You have
to follow these steps to run apps on the Kubernetes cluster: we need to create
an AWS EKS cluster with AWS console, SDK, or AWS CLI. Create a worker node
group that registers with EKS Cluster, when your cluster is ready, you can
configure kubectl to communicate with your cluster,
Deploy
Network load
balancing on Amazon EKS
Network traffic is load balanced at L4 of the OSI model.
To load balance application traffic at L7, you deploy a
Kubernetes ingress, which provisions an AWS Application Load Balancer. For more
information, see Application load balancing on Amazon
EKS.
To learn more about the differences between the two types of load balancing,
see Elastic Load Balancing features on the AWS
website.
When you create a Kubernetes Service of type LoadBalancer, the AWS cloud provider
load balancer controller creates AWS Classic Load Balancers by default, but
can also create AWS Network Load Balancers. This controller is
only receiving critical bug fixes in the future. For more information about
using the AWS cloud provider load balancer, see the AWS cloud
provider load balancer controller in the Kubernetes documentation. Its
use is not covered in this topic.
For new services deployed to 1.19 or later clusters,
we recommend that you use version 2.4.2 or later of
the Installing the AWS Load Balancer
Controller add-on instead of the AWS cloud provider load balancer
controller. If your cluster is earlier than 1.19, then we recommend that
you use version 2.3.1 of the controller. The AWS Load Balancer Controller
creates AWS Network Load Balan ers,but doesn't create AWS Classic Load
Balancers. The remainder of this topic is about using the AWS Load Balancer
Controller.
An AWS Network Load Balancer can load balance network traffic to
pods deployed to Amazon EC2 IP and instance targets or to AWS Fargate IP targets.
For more information, see AWS Load
Balancer Controller on GitHub.
Prerequisites
Before you can load balance network traffic using the AWS Load
Balancer Controller, you must meet the following requirements.
·
Have an existing cluster. If you don't have an existing cluster,
see Getting started with Amazon EKS. If you need to update
the version of an existing cluster, see Updating an Amazon EKS cluster
Kubernetes version.
·
Have the AWS Load Balancer Controller deployed on your cluster.
For more information, see Installing the AWS Load Balancer
Controller add-on. We recommend version 2.4.2 or later for 1.19 or later clusters.
If your cluster is earlier than 1.19, then we recommend using version 2.3.1.
·
At least one subnet. If multiple tagged subnets are found in an
Availability Zone, the controller chooses the first subnet whose subnet ID comes
first lexicographically. The subnet must have at least eight available IP
addresses.
·
If you're using the AWS Load Balancer Controller version 2.1.1 or earlier,
subnets must be tagged as follows. If using version 2.1.2 or later, this tag
is optional. You might want to tag a subnet if you have multiple clusters
running in the same VPC, or multiple AWS services sharing subnets in a VPC, and
want more control over where load balancers are provisioned for each cluster.
If you explicitly specify subnet IDs as an annotation on a service object, then
Kubernetes and the AWS Load Balancer Controller use those subnets directly to
create the load balancer. Subnet tagging isn't required if you choose to use
this method for provisioning load balancers and you can skip the following
private and public subnet tagging requirements. Replace the luster-name wwithyour cluster
name.
o Key – kubernetes.io/cluster/cluster-name
o Value – shared or owned
·
Your public and private subnets must meet the following
requirements unless you explicitly specify subnet IDs as an annotation on a
service or ingress object. If you provision load balancers by explicitly
specifying subnet IDs as an annotation on a service or ingress object, then
Kubernetes and the AWS Load Balancer Controller use those subnets directly to
create the load balancer and the following tags aren't required.
o Private
subnets – Must be tagged in the following format. This is so that
Kubernetes and the AWS Load Balancer Controller know that the subnets can be
used for internal load balancers. If you use eksctl or an Amazon EKS
AWS AWS CloudFormation template to create your VPC after March 26, 2020, then
the subnets are tagged appropriately when they're created. For more information
about the Amazon EKS AWS AWS CloudFormation VPC templates, see Creating a VPC for your Amazon EKS
cluster.
o Key – kubernetes.io/role/internal-elb
o Value – 1
o Public
subnets – Must be tagged in the following format. This is so that
Kubernetes knows to use only those subnets for external load balancers instead
of choosing a public subnet in each Availability Zone (based on the
lexicographical order of the subnet IDs). If you use eksctl or an Amazon EKS
AWS CloudFormation template to create your VPC after March 26, 2020, then the
subnets are tagged appropriately when they're created. For more information
about the Amazon EKS AWS CloudFormation VPC templates, see Creating a VPC for your Amazon EKS
cluster.
o Key – kubernetes.io/role/elb
o Value – 1
If the subnet role tags aren't explicitly added, the Kubernetes
service controller examines the route table of your cluster VPC subnets to
determine if the subnet is private or public. We recommend that you don't rely
on this behavior, and instead explicitly add the private or public role tags.
The AWS Load Balancer Controller doesn't examine route tables and requires the
private and public tags to be present for successful aauto-discovery
Considerations
·
The configuration of your load balancer is controlled by
annotations that are added to the manifest for your service. Service
annotations are different when using the AWS Load Balancer Controller than they
are when using the AWS cloud provider load balancer controller. Make sure to
review the annotations for the AWS Load
Balancer Controller before deploying services.
·
When using the Amazon VPC CNI plugin for Kubernetes, the AWS Load Balancer
Controller can load balance to Amazon EC2 IP or instance targets and Fargate IP
targets. When using Alternate compatible CNI plugins, the controller can
only load balance to instance targets. For more information about Network Load
Balancer target types, see Target type in the User Guide
for Network Load Balancers
·
If you want to add tags to the load balancer when or after it's
created, add the following annotation in your service specification. For more
information, see AWS Resource
Tags in
the AWS Load Balancer Controller documentation.
service.beta.kubernetes.io/aws-load-balancer-additional-resource-tags
·
You can assign Elastic IP addresses to the Network
Load Balancer by adding the following annotation. Replace the example-values with the Allocation IDs of your Elastic IP
addresses. The number of Allocation IDs must match the
number of subnets that are used for the load balancer. For more information,
see the AWS Load
Balancer Controller documentation.
service.beta.kubernetes.io/aws-load-balancer-eip-allocations: eipalloc-xxxxxxxxxxxxxxxxx,eipalloc-yyyyyyyyyyyyyyyyy
·
Amazon EKS adds one inbound rule to the node's security group
for client traffic and one rule for each load balancer subnet in the VPC for
health checks for each Network Load Balancer that you create. deployment of service ofthee pe LoadBalancer can fail if Amazon EKS attempts to
create rules that exceed the quota for the maximum number of rules allowed for
a security group. For more information, see Security groups in Amazon VPC
quotas in the Amazon VPC User Guide. Consider the following options to minimize
the chances of exceeding the maximum number of rules for a security group,p:
o Request an increase in
your rules per security group quota. For more information, see Requesting a quota increase in the Service
Quotas User Guide.
o Use IP targets, rather
than instance targets. With IP targets, you can share rules for the same target
ports. You can manually specify load balancer subnets with an annotation. For
more information, see Annotations on GitHub.
o Use an ingress, instead
of service of tthe ype LoadBalancer, to send traffic to
your service. The AWS Application Load Balancer requires fewer rules than
Network Load Balancers. You can share an ALB across multiple ingresses. For
more information, see Application load balancing on Amazon
EKS.
You can't share a Network Load Balancer across multiple services.
o Deploy your clusters to
multiple accounts.
·
If your pods run on Windows in an Amazon EKS cluster, a single
service with a load balancer can support up to 64 backend pods. Each pod has
its own unique IP address. This is a limitation of the Windows OS on the Amazon
EC2 nodes.
·
We recommend only creating new Network Load Balancers with the
AWS Load Balancer Controller. Attempting to replace existing Network Load
Balancers created with the AWS cloud provider load balancer controller can result
in multiple Network Load Balancers that might cause application downtime.
Create
a network load balancer
You can create a network load balancer with IP or instance
targets.
·
IP
targets
·
Instance
targets
You can use IP
targets with pods deployed to Amazon EC2 nodes or Fargate. Your Kubernetes
service must be created as type LoadBalancer.
For more information, see Type LoadBalancer in the Kubernetes documentation.
To create a
load balancer that uses IP targets, add the following annotations to a service
manifest and deploy your service. The external value for aws-load-balancer-type is what causes the AWS Load Balancer
Controller, rather than the AWS cloud provider load balancer controller, to
create the Network Load Balancer. You can view a sample service manifest with the annotations.
service.beta.kubernetes.io/aws-load-balancer-type: "external"service.beta.kubernetes.io/aws-load-balancer-nlb-target-type: "ip"
Note
If you're load
balancing to IPv6 pods, add the following annotation. You
can only load balance over IPv6 to IP targets, not instance targets.
Without this annotation, load balancing is over IPv4.
service.beta.kubernetes.io/aws-load-balancer-ip-address-type: dualstack
Network Load
Balancers are created with the internal aws-load-balancer-scheme, by default. For internal Network Load Balancers, your Amazon EKS
cluster must be configured to use at least one private subnet in your VPC.
Kubernetes examines the route table for your subnets to identify whether they
are public or private. Public subnets have a route directly to the internet
using an internet gateway, but private subnets do not.
If you want to
create a Network Load Balancer in a public subnet to load balance to Amazon EC2
nodes (Fargate can only be private), specify internet-facing with the following annotation:
service.beta.kubernetes.io/aws-load-balancer-scheme: "internet-facing"
Note
The service.beta.kubernetes.io/aws-load-balancer-type:
"nlb-ip" annotation
is still supported for backwards compatibility. However, we recommend using the
previous annotations for new load balancers instead of service.beta.kubernetes.io/aws-load-balancer-type:
"nlb-ip".
Important
Do not edit the
annotations after creating your service. If you need to modify it, delete the
service object and create it again with the desired value for this annotation.
(Optional)
Deploy a sample application
Prerequisites
·
At least one public or private subnet in your cluster VPC.
·
Have the AWS Load Balancer Controller deployed on your cluster.
For more information, see Installing the AWS Load Balancer
Controller add-on. We recommend version 2.4.2 or later.
To deploy a sample application
1.
If you're deploying to Fargate, make sure you have an available
private subnet in your VPC and create a Fargate profile. If you're not
deploying to Fargate, skip this step. You can create the profile by running the
following command or in the AWS Management Console using the same
values for name and namespace that are in the
command. Replace the example values with your own.
2.eksctl create fargateprofile \
3.--clustermy-cluster\
4.--regionregion-code\
5.--namenlb-sample-app\
--namespace nlb-sample-app
6.
Deploy a sample application.
.
Create a namespace for the application.
kubectl create namespacenlb-sample-app
a.
Save the following contents to a file named sample-deployment.yaml file on your
computer.
b. apiVersion: apps/v1c. kind: Deploymentd. metadata:e. name: nlb-sample-appf. namespace: nlb-sample-appg. spec:h. replicas: 3i. selector:j. matchLabels:k. app: nginxl. template:m. metadata:n. labels:o. app: nginxp. spec:q. containers:r. - name: nginxs. image: public.ecr.aws/nginx/nginx:1.21t. ports:u. - name: tcp containerPort: 80v.
Apply the manifest to the cluster.
kubectl apply -fsample-deployment.yaml
7.
Create a service with an internet-facing Network Load Balancer
that load balances to IP targets.
.
Save the following contents to a file named sample-service.yaml file on your
computer. If you're deploying to Fargate nodes, remove the service.beta.kubernetes.io/aws-load-balancer-scheme:
internet-facing line.
a. apiVersion: v1b. kind: Servicec. metadata:d. name: nlb-sample-servicee. namespace: nlb-sample-appf. annotations:g. service.beta.kubernetes.io/aws-load-balancer-type: externalh. service.beta.kubernetes.io/aws-load-balancer-nlb-target-type: ipi. service.beta.kubernetes.io/aws-load-balancer-scheme: internet-facingj. spec:k. ports:l. - port: 80m. targetPort: 80n. protocol: TCPo. type: LoadBalancerp. selector: app: nginxq.
Apply the manifest to the cluster.
kubectl apply -fsample-service.yaml
8.
Verify that the service was deployed.
kubectl get svcnlb-sample-service-nnlb-sample-app
The example output is as follows.
NAME TYPE CLUSTER-IP EXTERNAL-IP PORT(S) AGEsample-serviceLoadBalancer10.100.240.137k8s-nlbsampl-nlbsampl-xxxxxxxxxx-xxxxxxxxxxxxxxxx.elb.region-code.amazonaws.com80:32400/TCP16h
Note
The values for 10.100.240.137 and xxxxxxxxxx-xxxxxxxxxxxxxxxx will be different
than the example output (they will be unique to your load balancer) and us-west-2 may be different
for you, depending on which AWS Region that cluster is in.
9.
Open the Amazon EC2 AWS Management Console. Select Target
Groups (under Load Balancing) in the left navigation pane.
In the Name column, select the target group's name where the
value in the Load loadncer column matches a portion of the
name in the EXTERNAL-IP column of the output in the previous step. For example,
you'd select the target group named k8s-default-samplese-xxxxxxxxxx if your output
were the same as the output above. The Target type is IP because that was
specified in the sample service manifest.
10.
Select the Target group and then select
the Targets tab. Under Registered targets, you
should see three IP addresses of the three replicas deployed in a previous
step. Wait until the status of all targets is healthy before
continuing. It might take several minutes before all targets are healthy. The targets might be
in an unhealthy state before changing to a healthy state.
11.
Send traffic to the service replacing xxxxxxxxxx-xxxxxxxxxxxxxxxx and us-west-2 with the values
returned in the output for a previous step for EXTERNAL-IP. If you deployed to a
private subnet, then you'll need to view the page from a device within your
VPC, such as a bastion host. For more information, see Linux Bastion
Hosts on AWS.
curl k8s-default-samplese-xxxxxxxxxx-xxxxxxxxxxxxxxxx.elb.region-code.amazonaws.com
The example output is as follows.
<!DOCTYPE html><html><head><title>Welcome to nginx!</title>...
12.
When you're finished with the sample deployment, service, and
namespace, remove them.
kubectl delete namespacenlb-sample-app
Application
load balancing on Amazon EKS
When you create a Kubernetes ingress, an AWS Application
Load Balancer (ALB) is provisioned that load balances application traffic. To
learn more, see What is an Application Load Balancer? in the Application Load Balancers User Guide and Ingress in the Kubernetes
documentation. ALBs can be used with pods that are deployed to nodes or to AWS
Fargate. You can deploy an ALB to public or private subnets.
Application traffic is balanced at L7 of the OSI model.
To load balance network traffic at L4, you deploy a
Kubernetes serviServicehe LoadBalancer type. This type
provisions an AWS Network Load Balancer. For more information, see Network load balancing on Amazon EKS. To learn more about
the differences between the two types of load balancing, see Elastic Load Balancing features on the AWS
website.
Prerequisites
Before you can load balance application traffic to an
application, you must meet the following requirements.
·
Have an existing cluster. If you don't have an existing cluster,
see Getting started with Amazon EKS. If you need to update
the version of an existing cluster, see Updating an Amazon EKS cluster
Kubernetes version.
·
Have the AWS Load Balancer Controller deployed on your cluster.
For more information, see Installing the AWS Load Balancer
Controller add-on. We recommend version 2.4.2 or later for 1.19 or later clusters.
If your cluster is earlier than 1.19, then we recommend using version 2.3.1.
·
At least two subnets in different Availability Zones. The AWS
Load Balancer Controller chooses one subnet from each Availability Zone. When
multiple tagged subnets are found in an Availability Zone, the controller chooses
the subnet whose subnet ID comes first lexicographically. Each subnet must have
at least eight available IP addresses.
If you're using multiple security groups attached to worker
node, exactly one security group must be tagged as follows. Replace cluster-name with your cluster
name.
o Key – kubernetes.io/cluster/cluster-name
o Value – shared or owned
·
If you're using the AWS Load Balancer Controller version 2.1.1 or earlier,
subnets must be tagged in the format that follows. If you're using
version 2.1.2 or later, tagging is optional. However, we recommend that
you tag a subnet if any of the following is the case. You have multiple
clusters that are running in the same VPC, or have multiple AWS services that
share subnets in a VPC. Or, you want more control over where load balancers are
provisioned for each cluster. Replace cluster-name with your cluster
name.
o Key – kubernetes.io/cluster/cluster-name
o Value – shared or owned
·
Your public and private subnets must meet the following
requirements. This is unless you explicitly specify subnet IDs as an annotation
on a service or ingress object. Assume that you provision load balancers by
explicitly specifying subnet IDs as an annotation on a service or ingress
object. In this situation, Kubernetes and the AWS load balancer controller use
those subnets directly to create the load balancer and the following tags
aren't required.
o Private
subnets – Must be tagged in the following format. This is so that
Kubernetes and the AWS load balancer controller know that the subnets can be
used for internal load balancers. If you use eksctl or an Amazon EKS
AWS CloudFormation template to create your VPC after March 26, 2020, the
subnets are tagged appropriately when created. For more information about the
Amazon EKS AWS CloudFormation VPC templates, see Creating a VPC for your Amazon EKS
cluster.
o Key – kubernetes.io/role/internal-elb
o Value – 1
o Public
subnets – Must be tagged in the following format. This is so that
Kubernetes knows to use only the subnets that were specified for external load
balancers. This way, Kubernetes doesn't choose a public subnet in each
Availability Zone (lexicographically based on their subnet ID). If you
use eksctl or an Amazon EKS AWS CloudFormation template to create
your VPC after March 26, 2020, the subnets are tagged appropriately when
created. For more information about the Amazon EKS AWS CloudFormation VPC
templates, see Creating a VPC for your Amazon EKS
cluster.
o Key – kubernetes.io/role/elb
o Value – 1
If the subnet role tags aren't explicitly added, the Kubernetes
service controller examines the route table of your cluster VPC subnets. This
is to determine if the subnet is private or public. We recommend that you don't
rely on this behavior. Rather, explicitly add the private or public role tags.
The AWS Load Balancer Controller doesn't examine route tables. It also requires
the private and public tags to be present for successful auto discovery.
Considerations
·
The AWS Load
Balancer Controller creates ALBs and the necessary supporting AWS resources
whenever a Kubernetes ingress resource is created on the cluster with the kubernetes.io/ingress.class:
alb annotation.
The ingress resource configures the ALB to route HTTP or HTTPS traffic to
different pods within the cluster. To ensure that your ingress objects use the
AWS Load Balancer Controller, add the following annotation to your Kubernetes
ingress specification. For more information, see Ingress
specification on GitHub.
·annotations:
kubernetes.io/ingress.class:
alb
Note
If you're load balancing to IPv6 pods, add the
following annotation to your ingress spec. You can only load balance over IPv6 to IP targets, not
instance targets. Without this annotation, load balancing is over IPv4.
alb.ingress.kubernetes.io/ip-address-type: dualstack
·
The AWS Load Balancer Controller supports the following traffic
modes:
o Instance – Registers nodes
within your cluster as targets for the ALB. Traffic reaching the ALB is routed
to NodePort for your service and then proxied to your pods. This is
the default traffic mode. You can also explicitly specify it with the alb.ingress.kubernetes.io/target-type:
instance annotation.
Note
Your Kubernetes service must specify the NodePort or
"LoadBalancer" type to use this traffic mode.
o IP – Registers pods
as targets for the ALB. Traffic reaching the ALB is directly routed to pods for
your service. You must specify the alb.ingress.kubernetes.io/target-type:
ip annotation
to use this traffic mode. The IP target type is required when target pods are
running on Fargate.
·
To tag ALBs created by the controller, add the following
annotation to the controller: alb.ingress.kubernetes.io/tags. For a list of all
available annotations supported by the AWS Load Balancer Controller, see Ingress
annotations on GitHub.
·
Upgrading or downgrading the ALB controller version can
introduce breaking changes for features that rely on it. For more information
about the breaking changes that are introduced in each release, see the ALB controller
release notes on GitHub.
To share an application load balancer
across multiple service resources using IngressGroups
To join an ingress to a group, add the following annotation to a
Kubernetes ingress resource specification.
alb.ingress.kubernetes.io/group.name:my-group
The group name must:
·
Be 63 or fewer characters in length.
·
Consist of lower case letters, numbers, -, and .
·
Start and end with a letter or number.
The controller automatically merges ingress rules for all
ingresses in the same ingress group. It supports them with a single ALB. Most
annotations that are defined on an ingress only apply to the paths defined by
that ingress. By default, ingress resources don't belong to any ingress group.
Warning
Potential security risk: Specify an ingress group for an ingress
only when all the Kubernetes users that have RBAC permission to create or
modify ingress resources are within the same trust boundary. If you add the
annotation with a group name, other Kubernetes users might create or modify
their ingresses to belong to the same ingress group. Doing so can cause
undesirable behavior, such as overwriting existing rules with higher priority
rules.
You can add an order number of your ingress resource.
alb.ingress.kubernetes.io/group.order: '10'
The number can be 1-1000. The lowest number for all ingresses in
the same ingress group is evaluated first. All ingresses without this
annotation are evaluated with a value of zero. Duplicate rules with a higher
number can overwrite rules with a lower number. By default, the rule order
between ingresses within the same ingress group is determined lexicographically
based namespace and name.
Important
Ensure that each ingress in the same ingress group has a unique
priority number. You can't have duplicate order numbers across ingresses.
(Optional)
Deploy a sample application
Prerequisites
·
At least one public or private subnet in your cluster VPC.
·
Have the AWS Load Balancer Controller deployed on your cluster.
For more information, see Installing the AWS Load Balancer
Controller add-on. We recommend version 2.4.2 or later.
To deploy a sample application
You can run the sample application on a cluster that has Amazon
EC2 nodes, Fargate pods, or both.
1.
If you're not deploying to Fargate, skip this step. If you're
deploying to Fargate, create a Fargate profile. You can create the profile by
running the following command or in the AWS Management Console using the same
values for name and namespace that are in the
command. Replace the example values with your own.
2.eksctl create fargateprofile \
3.--clustermy-cluster\
4.--regionregion-code\
5.--namealb-sample-app\
--namespace game-2048
6.
Deploy the game 2048 as a sample
application to verify that the AWS Load Balancer Controller creates an AWS ALB
as a result of the ingress object. Complete the steps for the type of subnet
you're deploying to.
.
If you're deploying to pods in a cluster that you created with
the IPv6 family, skip to the next step.
·
Public
kubectl apply -f https://raw.githubusercontent.com/kubernetes-sigs/aws-load-balancer-controller/v2.4.2/docs/examples/2048/2048_full.yaml
·
Private
.
Download the manifest.
curl -o 2048_full.yaml https://raw.githubusercontent.com/kubernetes-sigs/aws-load-balancer-controller/v2.4.2/docs/examples/2048/2048_full.yaml
i.
Edit the file and find the line that says alb.ingress.kubernetes.io/scheme:
internet-facing.
ii.
Change internet-facing to internal and save the file.
iii.
Apply the manifest to your cluster.
kubectl apply -f 2048_full.yaml
a.
If you're deploying to pods in a cluster that you created with
the IPv6 family, complete the following
steps.
·
Download the manifest.
curl -o 2048_full.yaml https://raw.githubusercontent.com/kubernetes-sigs/aws-load-balancer-controller/v2.4.2/docs/examples/2048/2048_full.yaml
·
Open the file in an editor and add the following line to the
annotations in the ingress spec.
alb.ingress.kubernetes.io/ip-address-type: dualstack
·
If you're load balancing to internal pods, rather than internet
facing pods, change the line that says alb.ingress.kubernetes.io/scheme: internet-facing to alb.ingress.kubernetes.io/scheme: internal
·
Save the file.
·
Apply the manifest to your cluster.
kubectl apply -f 2048_full.yaml
7.
After a few minutes, verify that the ingress resource was
created with the following command.
kubectl get ingress/ingress-2048 -n game-2048
The example output is as follows.
NAME CLASS HOSTS ADDRESS PORTS AGEingress-2048 <none> * k8s-game2048-ingress2-xxxxxxxxxx-yyyyyyyyyy.region-code.elb.amazonaws.com 80 2m32s
Note
If you created the load balancer in a private subnet, the value
under ADDRESS in the previous output is prefaced
with internal-.
If your ingress wasn't successfully created after several
minutes, run the following command to view the AWS Load Balancer Controller
logs. These logs might contain error messages that you can use to diagnose
issues with your deployment.
kubectl logs -n kube-system deployment.apps/aws-load-balancer-controller
8.
If you deployed to a public subnet, open a browser and navigate
to the ADDRESS URL from the previous command output to see the sample
application. If you don't see anything, refresh your browser and try again. If
you deployed to a private subnet, then you'll need to view the page from a
device within your VPC, such as a bastion host. For more information, see Linux Bastion
Hosts on AWS.

9.
When you finish experimenting with your sample application,
delete it by running one of the the following commands.
·
If you applied the manifest, rather than applying a copy that
you downloaded, use the following command.
kubectl delete -f https://raw.githubusercontent.com/kubernetes-sigs/aws-load-balancer-controller/v2.4.2/docs/examples/2048/2048_full.yaml
·
If you downloaded and edited the manifest, use the following
command.
kubectl delete -f 2048_full.yaml
Restricting
external IP addresses that can be assigned to services
Kubernetes services can be reached from inside of a cluster
through:
- A cluster IP
address that is assigned automatically by Kubernetes
- Any IP address
that you specify for the externalIPs property in a service spec. External IP addresses
are not managed by Kubernetes and are the responsibility of the cluster
administrator. External IP addresses specified with externalIPs are
different than the external IP address assigned to a service of type the LoadBalancer by a cloud
provider.
To
learn more about Kubernetes services, see Service in
the Kubernetes documentation. You can restrict the IP addresses that can be
specified for externalIPs in a service spec.
To restrict the IP addresses that can be specified for externalIPs in
a service spec
- Deploy cert-manager
to manage webhook certificates. For more information, see the cert-manager documentation.
kubectl apply -f
https://github.com/jetstack/cert-manager/releases/download/v1.5.4/cert-manager.yaml
- Verify that the
cert-manager pods are running.
kubectl get pods -n cert-manager
The
example output is as follows.
NAME
READY STATUS RESTARTS
AGE
cert-manager-58c8844bb8-nlx7q 1/1 Running
0 15s
cert-manager-cainjector-745768f6ff-696h5 1/1 Running
0 15s
cert-manager-webhook-67cc76975b-4v4nk 1/1 Running
0 14s
- Review your
existing services to ensure that none of them have external IP addresses
assigned to them that aren't contained within the CIDR block you want to
limit addresses to.
kubectl get services -A
The
example output is as follows.
NAMESPACE NAME TYPE CLUSTER-IP EXTERNAL-IP PORT(S) AGE
cert-manager cert-manager ClusterIP 10.100.102.137 <none> 9402/TCP 20m
cert-manager cert-manager-webhook ClusterIP 10.100.6.136 <none> 443/TCP 20m
default kubernetes ClusterIP 10.100.0.1 <none> 443/TCP 2d1h
externalip-validation-system externalip-validation-webhook-service ClusterIP 10.100.234.179 <none> 443/TCP 16s
kube-system kube-dns ClusterIP 10.100.0.10 <none> 53/UDP,53/TCP 2d1h
my-namespace my-service ClusterIP 10.100.128.10 192.168.1.1 80/TCP 149m
If any
of the values are IP addresses that are not within the block you want to
restrict access to, you'll need to change the addresses to be within the block,
and redeploy the services. For example, the my-service service
in the previous output has an external IP address assigned to it that isn't
within the CIDR block example in step 5.
- Download the
external IP webhook manifest. You can also view the source
code for the webhook on GitHub.
curl -o externalip-webhook.yaml
https://s3.us-west-2.amazonaws.com/amazon-eks/docs/externalip-webhook.yaml
- Specify CIDR
blocks. Open the downloaded file in your editor and remove the # at the start of the
following lines.
6.
#args:
#- --allowed-external-ip-cidrs=10.0.0.0/8
Replace 10.0.0.0/8 with
your own CIDR block. You can specify as many blocks as you like. If specifying
mutiple blocks, add a comma between blocks.
- If your cluster
is not in the us-west-2 AWS
Region, then replace us-west-2, 602401143452, and amazonaws.com in the
file with the following commands. Before running the commands,
replace region-code and 111122223333 with the
value for your AWS Region from the list in Amazon container
image registries.
8.
sed -i.bak -e 's|602401143452|111122223333|' externalip-webhook.yaml
9.
sed -i.bak -e 's|us-west-2|region-code|'
externalip-webhook.yaml
sed -i.bak -e 's|amazonaws.com||'
externalip-webhook.yaml
- Apply the
manifest to your cluster.
kubectl apply -f externalip-webhook.yaml
An
attempt to deploy a service to your cluster with an IP address specified
for externalIPs that
is not contained in the blocks that you specified in the Specify CIDR blocks step
will fail.
Copy a
container image from one repository to another repository
This topic describes how to pull a container image from a
repository that your nodes don't have access to and push the image to a
repository that your nodes have access to. You can push the image to Amazon ECR
or an alternative repository that your nodes have access to.
Prerequisites
- The Docker
engine is installed and configured on your computer. For instructions,
see Install Docker
Engine in
the Docker documentation.
- Version 2.6.3 or later or 1.23.11 or later of the AWS CLI
installed and configured on your computer or AWS CloudShell. For more
information, see Installing,
updating, and uninstalling the AWS CLI and Quick
configuration with aws configure in the AWS
Command Line Interface User Guide.
- An interface VPC
endpoint for Amazon ECR if you want your nodes to pull container images
from or push container images to a private Amazon ECR repository over
Amazon's network. For more information, see Create the VPC
endpoints for Amazon ECR in the Amazon Elastic
Container Registry User Guide.
Complete
the following steps to pull a container image from a repository and push it to
your own repository. In the following examples that are provided in this topic,
the image for the Metrics helper is
pulled. When you follow these steps, make sure to replace the example values with
your own values.
To copy a container image from one repository to another
repository
- If you don't
already have an Amazon ECR repository or another repository, then create
one that your nodes have access to. The following command creates an
Amazon ECR private repository. An Amazon ECR private repository name must
start with a letter. It can only contain lowercase letters, numbers,
hyphens (-), underscores (_), and forward slashes (/). For more
information, see Creating a
private repository in the Amazon Elastic
Container Registry User Guide.
You can
replace the cni-metrics-helper with whatever you
choose. As a best practice, create a separate repository for each image. We
recommend this because image tags must be unique within a repository. Replace region-code with
an AWS Region supported
by Amazon ECR.
aws ecr create-repository --region region-code
--repository-name cni-metrics-helper
- Determine the
registry, repository, and tag (optional) of the image that your nodes need
to pull. This information is in the registry/repository[:tag] format.
Many of
the Amazon EKS topics about installing images require that you apply a manifest
file or install the image using a Helm chart. However, before you apply a
manifest file or install a Helm chart, first view the contents of the manifest
or chart's values.yaml file. That way, you can determine the
registry, repository, and tag to pull.
For
example, you can find the following line in the manifest
file for the Metrics helper. The
registry is 602401143452.dkr.ecr.us-west-2.amazonaws.com, which
is an Amazon ECR private registry. The repository is cni-metrics-helper.
image:
"602401143452.dkr.ecr.us-west-2.amazonaws.com/cni-metrics-helper:v1.11.2"
You may
see the following variations for an image location:
- Only repository-name:tag. In this
case, docker.io is
usually the registry, but not specified since Kubernetes prepends it to a
repository name by default if no registry is specified.
- repository-name/repository-namespace/repository:tag. A repository
namespace is optional, but is sometimes specified by the repository owner
for categorizing images. For example, all Amazon EC2
images in the Amazon ECR Public Gallery use
the aws-ec2 namespace.
Before
installing an image with Helm, view the Helm values.yaml file
to determine the image location. For example, the values.yaml file
for the Metrics helper includes
the following lines.
image:
region: us-west-2
tag: v1.11.2
account: "602401143452"
domain: "amazonaws.com"
- Pull the
container image specified in the manifest file.
- If you're
pulling from a public registry, such as the Amazon ECR Public Gallery, you can skip
to the next sub-step, because authentication isn't required. In this
example, you authenticate to an Amazon ECR private registry that contains
the repository for the CNI metrics helper image. Amazon EKS
maintains the image in each registry listed in Amazon
container image registries. You can authenticate to any of
the registries by replacing 602401143452 and region-code with the
information for a different registry. A separate registry exists for
each AWS Region that
Amazon EKS is supported in.
aws ecr get-login-password --region region-code | docker
login --username AWS --password-stdin 602401143452.dkr.ecr.region-code.amazonaws.com
- Pull the image.
In this example, you pull from the registry that you authenticated to in
the previous sub-step. Replace 602401143452 and region-code with the
information that you provided in the previous sub-step.
docker pull 602401143452.dkr.ecr.region-code.amazonaws.com/cni-metrics-helper:v1.11.2
- Tag the image
that you pulled with your registry, repository, and tag. The following
example assumes that you pulled the image from the manifest file and are
going to push it to the Amazon ECR private repository that you created in
the first step. Replace 111122223333 with your
account ID. Replace region-code with the AWS Region that you
created your Amazon ECR private repository in.
docker tag cni-metrics-helper:v1.11.2 111122223333.dkr.ecr.region-code.amazonaws.com/cni-metrics-helper:v1.11.2
- Authenticate to
your registry. In this example, you authenticate to the Amazon ECR private
registry that you created in the first step. For more information,
see Registry
authentication in the Amazon Elastic Container Registry User
Guide.
aws ecr get-login-password --region region-code | docker
login --username AWS --password-stdin 111122223333.dkr.ecr.region-code.amazonaws.com
- Push the image
to your repository. In this example, you push the image to the Amazon ECR
private repository that you created in the first step. For more
information, see Pushing a Docker
image in
the Amazon Elastic Container Registry User Guide.
docker push 111122223333.dkr.ecr.region-code.amazonaws.com/cni-metrics-helper:v1.11.2
- Update the
manifest file that you used to determine the image in a previous step with
the registry/repository:tag for the
image that you pushed. If you're installing with a Helm chart, there's
often an option to specify the registry/repository:tag. When installing the chart,
specify the registry/repository:tag for the
image that you pushed to your repository.
Amazon
container image registries
When you deploy add-ons such as the Installing the AWS
Load Balancer Controller add-on, the Amazon VPC CNI plugin
for Kubernetes, kube-proxy,
or storage drivers to
your cluster, your nodes might pull the container image from an Amazon EKS
Amazon ECR private repository. The image's registry, repository, and tag are
specified in a manifest or Helm values.yaml file referenced in
the topics for each add-on that you deploy.
Amazon
EKS replicates the images to a repository in each Amazon EKS supported AWS
Region. Your nodes can pull the container image over the internet from any of
the following registries. Alternatively, your nodes can pull the image over
Amazon's network if you created an interface VPC endpoint
for Amazon ECR (AWS PrivateLink) in your VPC. The
registries require authentication with an AWS IAM account. Your nodes
authenticate using the Amazon EKS node IAM
role, which has the permissions in the AmazonEC2ContainerRegistryReadOnly managed
IAM policy associated to it.
|
AWS Region |
Registry |
|
af-south-1 |
877085696533.dkr.ecr.af-south-1.amazonaws.com |
|
ap-east-1 |
800184023465.dkr.ecr.ap-east-1.amazonaws.com |
|
ap-northeast-1 |
602401143452.dkr.ecr.ap-northeast-1.amazonaws.com |
|
ap-northeast-2 |
602401143452.dkr.ecr.ap-northeast-2.amazonaws.com |
|
ap-northeast-3 |
602401143452.dkr.ecr.ap-northeast-3.amazonaws.com |
|
ap-south-1 |
602401143452.dkr.ecr.ap-south-1.amazonaws.com |
|
ap-southeast-1 |
602401143452.dkr.ecr.ap-southeast-1.amazonaws.com |
|
ap-southeast-2 |
602401143452.dkr.ecr.ap-southeast-2.amazonaws.com |
|
ap-southeast-3 |
296578399912.dkr.ecr.ap-southeast-3.amazonaws.com |
|
ca-central-1 |
602401143452.dkr.ecr.ca-central-1.amazonaws.com |
|
cn-north-1 |
918309763551.dkr.ecr.cn-north-1.amazonaws.com |
|
cn-northwest-1 |
961992271922.dkr.ecr.cn-northwest-1.amazonaws.com |
|
eu-central-1 |
602401143452.dkr.ecr.eu-central-1.amazonaws.com |
|
eu-north-1 |
602401143452.dkr.ecr.eu-north-1.amazonaws.com |
|
eu-south-1 |
590381155156.dkr.ecr.eu-south-1.amazonaws.com |
|
eu-west-1 |
602401143452.dkr.ecr.eu-west-1.amazonaws.com |
|
eu-west-2 |
602401143452.dkr.ecr.eu-west-2.amazonaws.com |
|
eu-west-3 |
602401143452.dkr.ecr.eu-west-3.amazonaws.com |
|
me-south-1 |
558608220178.dkr.ecr.me-south-1.amazonaws.com |
|
sa-east-1 |
602401143452.dkr.ecr.sa-east-1.amazonaws.com |
|
us-east-1 |
602401143452.dkr.ecr.us-east-1.amazonaws.com |
|
us-east-2 |
602401143452.dkr.ecr.us-east-2.amazonaws.com |
|
us-gov-east-1 |
151742754352.dkr.ecr.us-gov-east-1.amazonaws.com |
|
us-gov-west-1 |
013241004608.dkr.ecr.us-gov-west-1.amazonaws.com |
|
us-west-1 |
602401143452.dkr.ecr.us-west-1.amazonaws.com |
|
us-west-2 |
602401143452.dkr.ecr.us-west-2.amazonaws.com |
Amazon EKS
add-ons
An add-on is software that provides supporting operational
capabilities to Kubernetes applications, but is not specific to the
application. This includes software like observability agents or Kubernetes
drivers that allow the cluster to interact with underlying AWS resources for
networking, compute, and storage. Add-on software is typically built and
maintained by the Kubernetes community, cloud providers like AWS, or
third-party vendors. Amazon EKS automatically installs self-managed add-ons
such as the Amazon VPC CNI plugin for Kubernetes, kube-proxy, and
CoreDNS for every cluster. You can change the default configuration of the
add-ons and update them when desired.
Amazon
EKS add-ons provide installation and management of a curated set of add-ons for
Amazon EKS clusters. All Amazon EKS add-ons include the latest security
patches, bug fixes, and are validated by AWS to work with Amazon EKS. Amazon
EKS add-ons allow you to consistently ensure that your Amazon EKS clusters are
secure and stable and reduce the amount of work that you need to do in order to
install, configure, and update add-ons. If a self-managed add-on, such as kube-proxy is
already running on your cluster and is available as an Amazon EKS add-on, then
you can install the kube-proxy Amazon EKS add-on to start benefiting from the
capabilities of Amazon EKS add-ons.
You can
update specific Amazon EKS managed configuration fields for Amazon EKS add-ons
through the Amazon EKS API. You can also modify configuration fields not
managed by Amazon EKS directly within the Kubernetes cluster once the add-on
starts. This includes defining specific configuration fields for an add-on
where applicable. These changes are not overridden by Amazon EKS once they are
made. This is made possible using the Kubernetes server-side apply feature. For
more information, see Amazon EKS add-on
configuration.
Amazon
EKS add-ons can be used with any 1.18 or later Amazon EKS
cluster. The cluster can include self-managed and Amazon EKS managed node
groups, and Fargate.
Considerations
- To configure
add-ons for the cluster your IAM user must have IAM permissions to work
with add-ons. For more information, see the actions with Addon in their name in Actions defined
by Amazon Elastic Kubernetes Service.
- Amazon EKS
add-ons are only available with Amazon EKS clusters running Kubernetes
version 1.18 and later.
- Amazon EKS
add-ons run on the nodes that you provision or configure for your cluster.
Node types include Amazon EC2 instances and Fargate.
- You can modify
fields that aren't managed by Amazon EKS to customize the installation of
an Amazon EKS add-on. For more information, see Amazon EKS
add-on configuration.
- If you create a
cluster with the AWS Management Console, the Amazon EKS kube-proxy, Amazon VPC CNI
plugin for Kubernetes, and CoreDNS Amazon EKS add-ons are automatically
added to your cluster. If you use eksctl to create your cluster with
a config file, eksctl can also create the cluster
with Amazon EKS add-ons. If you create your cluster using eksctl without a config file or with any other tool,
the self-managed kube-proxy, Amazon VPC CNI plugin for Kubernetes, and CoreDNS
add-ons are installed, rather than the Amazon EKS add-ons. You can either
manage them yourself or add the Amazon EKS add-ons manually after cluster
creation.
You can
add, update, or delete Amazon EKS add-ons using the Amazon EKS API, AWS
Management Console, AWS CLI, and eksctl. For detailed steps when
using the AWS Management Console, AWS CLI, and eksctl, see
the topics for the following add-ons:
You can
also create Amazon EKS add-ons using AWS CloudFormation.
Amazon EKS
add-on configuration
Amazon EKS add-ons are installed to your cluster using standard,
best practice configurations. For more information about Amazon EKS add-ons,
see Amazon EKS add-ons.
You may want to customize the configuration of an Amazon EKS
add-on to enable advanced features. Amazon EKS uses the Kubernetes server-side
apply feature to enable management of an add-on by Amazon EKS without
overwriting your configuration for settings that aren't managed by Amazon EKS.
For more information, see Server-Side
Apply in the Kubernetes documentation. To achieve this, Amazon EKS
manages a minimum set of fields for every add-on that it installs. You can
modify all fields that aren't managed by Amazon EKS, or another Kubernetes
control plane process such as kube-controller-manager, without issue.
Important
Modifying a field managed by Amazon EKS prevents Amazon EKS from
managing the add-on and may result in your changes being overwritten when an
add-on is updated.
Prerequisites
·
An existing 1.18 or later Amazon EKS cluster.
·
An Amazon EKS add-on added to the cluster. For more information
about adding an Amazon EKS add-on to your cluster, see Amazon EKS add-ons.
View
field management status
You can use kubectl to see which
fields are managed by Amazon EKS for any Amazon EKS add-on.
To see the management status of a field
1.
Determine which add-on that you want to examine. To see all of
the deployments and DaemonSets deployed to your
cluster, see View Kubernetes resources.
2.
View the managed fields for an add-on by running the following
command:
kubectl gettype/add-on-name-nadd-on-namespace-o yaml
For example, you can see the managed fields for the CoreDNS
add-on with the following command.
kubectl get deployment/coredns -n kube-system -o yaml
Field management is listed in the following section in the
returned output.
...managedFields: - apiVersion: apps/v1 fieldsType: FieldsV1 fieldsV1: ...
Note
If you don't see managedFields in the output,
add --show-managed-fields to the command and
run it again. The version of kubectl that you're using determines
whether managed fields are returned by default.
Understanding
field management syntax in the Kubernetes API
When you view details for a Kubernetes object, both managed and
unmanaged fields are returned in the output. Managed fields can be either of
the following types:
·
Fully managed – All keys for the
field are managed by Amazon EKS. Modifications to any value causes a conflict.
·
Partially managed – Some keys for
the field are managed by Amazon EKS. Only modifications to the keys explicitly
managed by Amazon EKS cause a conflict.
Both types of fields are tagged with manager: eks.
Each key is either a . representing the
field itself, which always maps to an empty set, or a string that represents a
sub-field or item. The output for field management consists of the following
types of declarations:
·
f:<name>, where <name> is the name of a
field in a list.
·
k:<keys>, where <keys> is a map of a list
item's fields.
·
v:<value>, where <value> is the exact json
formatted value of a list item.
·
i:<index>, where <index> is position of an
item in the list.
For more information, see FieldsV1 v1 meta in the Kubernetes
documentation.
The following portions of output for the CoreDNS add-on
illustrate the previous declarations:
·
Fully managed fields – If a managed
field has an f: (field) specified, but no k: (key), then the
entire field is managed. Modifications to any values in this field cause a
conflict.
In the following output, you can see that the container
named coredns is managed by eks. The args, image, and imagePullPolicy sub-fields are
also managed by eks. Modifications to any values in these fields cause a conflict.
...f:containers: k:{"name":"coredns"}: .: {} f:args: {} f:image: {} f:imagePullPolicy: {}...manager: eks...
·
Partially managed fields – If a managed key
has a value specified, the declared keys are managed for that field. Modifying
the specified keys cause a conflict.
In the following output, you can see that eks manages the config-volume and tmp volumes set with
the name key.
...f:volumes: k:{"name":"config-volume"}: .: {} f:configMap: f:items: {} f:name: {} f:name: {} k:{"name":"tmp"}: .: {} f:name: {}...manager: eks...
·
Adding keys to partially managed fields – If only a
specific key value is managed, you can safely add additional keys, such as
arguments, to a field without causing a conflict. If you add additional keys,
make sure that the field isn't managed first. Adding or modifying any value
that is managed causes a conflict.
In the following output, you can see that both the name key and name field are managed.
Adding or modifying any container name causes a conflict with this managed key.
...f:containers: k:{"name":"coredns"}:... f:name: {}...manager: eks...


No comments:
Post a Comment